
Alarm w Start Premium Install
- Description
- ALARM REMOTE START INSTALL TIMEFRAME
- ALARM REMOTE START INSTALL STEPS
- ALARM REMOTE START TROUBLE SHOOTING
All Connections Soldered
Remote Start Install Time 1.5 to 5 Hours
Alarm Install 1.5 to 3 Hours
Remote Start / Alarm Install 3 to 6 Hours
What affects the time frame:
Wire Routing.
Dash Dissembly and Assembly.
Integration to Car Features when available.
Integration into Door Locks.
Bypass factory security for Remote Start.
Antenna Mounting.
Programming of Features.
LED Mounting location.
Siren Mounthing location.
Integrate into multiple power locations.
-
Gather Your Tools and Materials:
- Car alarm and remote start system
- Wire strippers, crimping tool, soldering iron, and solder
- Multimeter, test light, screwdrivers, and electrical tape
- Wiring diagram for your vehicle
-
Prepare the Vehicle:
- Disconnect the Battery: For safety, disconnect the negative terminal of your car battery.
- Locate Installation Points: Identify where you'll mount the alarm control unit, siren, and other components.
- Remove Interior Panels: Carefully remove panels to access wiring.
-
Install the Alarm Control Unit:
- Choose a Location: Select a secure and accessible location, often behind the dashboard or under the steering wheel.
- Secure the Control Unit: Mount the control unit using screws or adhesive tape.
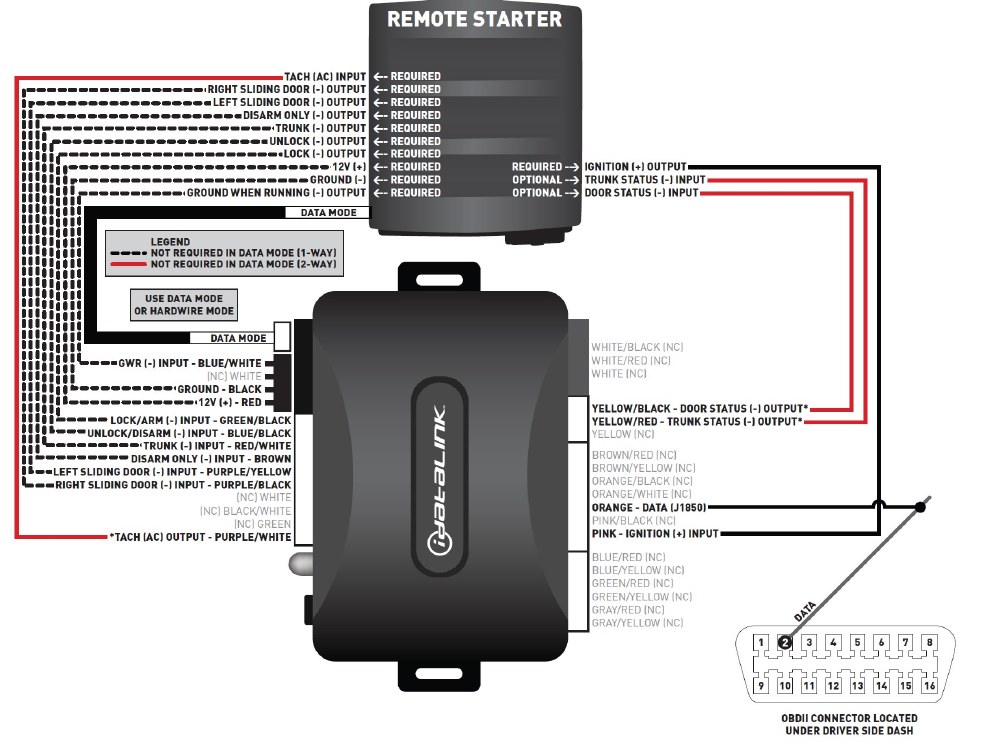
- Connect Power and Ground: Connect the control unit’s power and ground wires to the vehicle’s battery.
-
Mount the Siren:
- Choose a Location: Typically under the hood, away from heat sources.
- Run the Wire: Feed the wire through the firewall to the control unit.
-
Connect Door and Hood Switches:
- Install Switches: Mount the switches on the doors and hood.
- Wire the Switches: Connect the switches to the control unit.
-
Install the Remote Start System:
- Connect to Ignition Wires: Locate and connect the remote start wires to the ignition wires.
- Connect to Brake and Tachometer Wires: Ensure the system can detect when the car is running and when the brake is pressed.
-
Program the Remote:
- Follow Instructions: Program the remote control according to the system’s instructions.
- Test the Remote: Test all functions, including remote start, alarm activation, and panic button.
-
Reassemble and Test:
- Reassemble Panels: Put all interior panels back in place.
- Reconnect the Battery: Reconnect the negative terminal of the battery.
- Test the System: Ensure all features work correctly and make any necessary adjustments.
-
Remote Start Doesn't Activate:
- Check the Battery: Ensure the remote has a working battery
- Verify Connections: Make sure all wiring connections are secure and correct
- Safety Checks: Ensure the vehicle is in park, the hood is closed, and the doors are locked
-
System Enters Protection Mode:
- Hood Pin Switch: A faulty or missing hood pin switch can prevent the system from working
- Check Engine Light: If the check engine light is on, the remote start may not function
-
No Response from Remote:
- Range Issues: Try starting the vehicle from a closer distance
- Interference: Ensure there are no obstructions around the remote start receiver
-
Alarm Triggers Unexpectedly:
- Sensor Sensitivity: Adjust the sensitivity of the shock or tilt sensors
- Wiring Issues: Check for any loose or damaged wires that might be causing false alarms
-
Engine Starts but Shuts Off Quickly:
- Tachometer Signal: Ensure the tachometer signal wire is properly connected
- Fuel System: Verify that the fuel system is functioning correctly and that there are no issues with fuel delivery
-
Remote Start Works Intermittently:
- Ground Connections: Ensure all ground connections are secure and free of corrosion
- Bypass Module: If using a bypass module, make sure it is properly programmed and connected
Reviews
Accessories
Showcased Accessories
Please choose a department and category to see accessories compatible with this product.
Add-ons


Share:
Share on Facebook Share on Twitter Share on Pinterest Tell a friend